
Helaborado an Ubuntu installation tutorial . Ubuntu version I used is the latest 8.04 Hardy Heron . The tutorial is specially designed for those who are new to the area and who wish to make a safe installation. I hope you find it useful. 
applied Cases the tutorial:
clarify this because there are now many types of computers, probably not work in some article that I prepared. Therefore I think this tutorial is useful for installing Ubuntu under the following conditions:
- The tutorial is valid for the version of Ubuntu 8.04 (Hardy Heron)
- new
- Computers PC running Windows XP and want to have both Ubuntu.
- Computers that do not want to have Windows Vista

- That there is at least 384 MB of RAM (Later I will explain this point)
- That is at least 5 GB of free disk space hard.
Considerations regarding the hard drive:
This tutorial is valid in any of the following 4 cases according to the configuration of your hard drive on your computer:
- The hard disk has only one partition which Windows is installed (and I want to keep)
- The hard disk has only one partition on which Windows is installed (but I no longer have)
- The hard disk has Windows but also has more than one partition.
- I have more than one hard disk
Note: My recommendation is that if we stick with Windows, the best would create 2 partitions, install Windows and then install Ubuntu. I say this because if we want to install Ubuntu while in case 1, the process takes a little longer than normal (depending on the size of your hard drive) and Windows and often not fit properly (imagine that electricity is cut off when the process is going to mean ...)
Perhaps the tutorial work on more cases, for example, computers that have Vista and you want to have both systems, but I unfortunately I have no desire installing Vista and power evaluate, or perhaps on a Mac (in my country are too expensive to think about buying one, so I can not say that the installation was done in the way I explain it.)
Preparing to Install
- Make a backup of your data to another hard disk or CDs or DVDs (if we make an error)
- If we have only one partition and Windows XP installed on it, defragment the hard drive
- If we do not have the installation disk, download from Ubuntu website , and then burn it to CD.
Step 1: Configure the computer boot from CD
When you turn on your computer to access the option that allows you to boot from the CD (in some recent teams enter by pressing F8), if in case your computer has that option will have to enter the BIOS (or Setup) and set it from there. Access keys most common are: F2, Delete or Ctrl + Alt + Esc If you do not know how to do this, you should read the manual for the Motherboard. When you find yourself already configured to boot from the CD, insert the Ubuntu installation disc and restart your computer.
Step 2: Enter the Live CD mode
After rebooting, we will see a screen with a drop down menu. Select "English" or the language you wish to have in Ubuntu. After that we appear following screen:
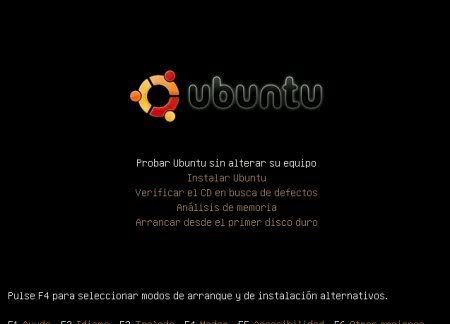
select the option "Try Ubuntu Without altering the equipment."
is Live CD
LiveCD is the mode of assessment without having to install Ubuntu on our team. That is why we need a certain amount of RAM (more than 256 MB) and the whole system is loaded into memory. The usefulness of the LiveCD is that we can check if all your hardware works properly in Ubuntu.
After loading the system will appear something like this:
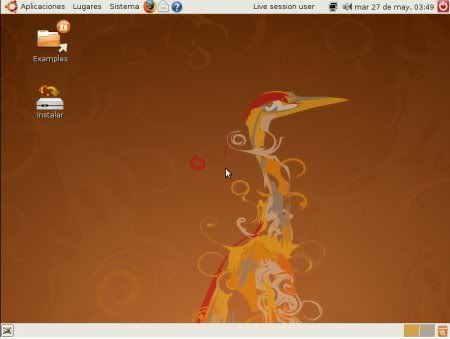
Very nice no?
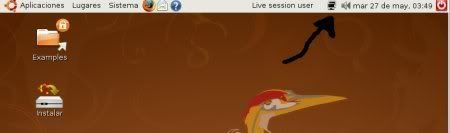
If we have Internet service and connection is through network cables, Ubuntu automatically generate an IP address by DHCP (You can evaluate the connection through Firefox). If your connection is via wireless, you must enter our password (if have) and we connect to the network:
If you do not have internet no problem, only thing is that translation packages English for some applications and the respective updates are not installed.
Step 3: Running
- Double-click on the install icon that appears on the desktop.
- giving you a window Welcome to the setup, here you can choose the language you have the system. Click on "Forward."
- Now you must choose your location on the map. The locations listed by city (you can click on the dots). After selecting your city, you click on "Next."
- is turn to select the setting on your keyboard. At the bottom is a text box where you can start testing the configuration that you see fit. After selecting a configuration you click on "Next."
Step 4: Preparing the Hard Disk
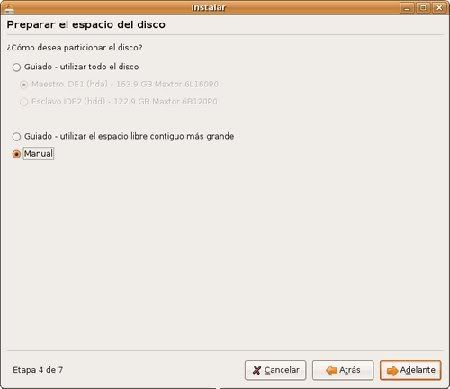
We'll have 3 options, I NOTED that cases can use each:
Guided (use entire disk) :
This erases all the data we have on the disk. If you have 1 hard drive this would be appropriate if we want to have only Ubuntu on your computer. If you have more than one hard drive and one of these disks is intended for Ubuntu, it is recommended this option. Remember that if you have multiple disks, you must select the one that is destined to install Ubuntu. Guided
Use largest continuous free space:
This option is useful if your hard drive has only a partition and have installed Windows on it. This is the easiest way to have Ubuntu + Windows. If you are new partition I recommend this option.
Manual:
This is the option where you can customize all aspects of partitioning your hard drive. If your hard drive is more than one partition, this is the option you choose.
If you chose one of the first 2 options, just click on "Next" and proceed to Step 5. If you selected the Manual option passes to the special case 4.1.
Note: If you have no idea which is partitioned into Linux, you can read this small guide here . Special case
4.1: Manually setting the hard disk
Once in this option will appear a screen like this:
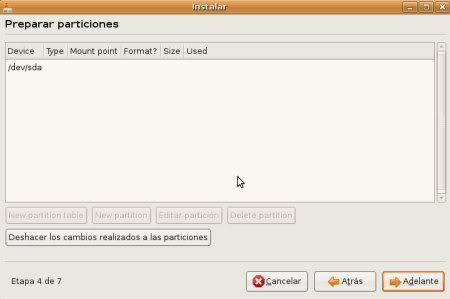
- Select the partition you want to install Ubuntu
- Click on "Delete Partition (Delete partition) Select the partition
- "Free space" and click on "New Partition"
- You will see a screen like this:
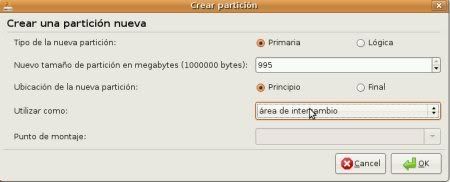
Now the first thing we will create a swap partition (It is a type of partition in Linux that works like RAM). In " new partition type " select Primary. In "new partition size " writes twice as much RAM memory you have. For example if your computer has 256 MB, then you write 512. In " location of the new partition " select start. In "Use as " select the "Exchange Area". Now just click OK.
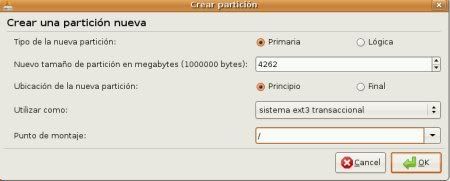
Again select the partition "Free space" and click on "New Partition".
Now if we create the partition on which we installed Ubuntu. In " new partition type " select Primary. In "new partition size " If you do not think creating another partition leaves the size that appears by default or enter the size you want to take part. In " location of the new partition " Select Top. In "Use as " select "ext3 transactional" or " ext2 filesystem" both are Linux native formats optimized for the system. Finally in "Mount Point " type "/". This bias is equivalent to C: / Windows or root directory. Now just click "OK."
If you feel that something is not right or wrong make you a step just click "Undo changes to partitions" and go again partitions are as at the beginning.
Now just click "Next."
Step 5: Introducing our information
I think this step is about understanding. Just remember that we can not forget the password, meaning that if you do not write do not let you take the next step, besides the user name you type in all lowercase. Now you click on "forward."
Step 6: Migration of documents and accounts
If your disk already had an operating system already installed, this option allows you to migrate certain aspects such as wallpaper, your bookmarks in Firefox, and some other little something more. If the hard disk was clean, do not see this option.
Step 7: Verification of process
This screen verifies that all is well, what really is a window with a summary of your own. If everything is ok click "Install ." The process usually lasts between 20 and 40 minutes, this depends on your computer. C'mon, it's time to start Ubuntu released.
Step 8: Make your first exploration Ubuntu
If you are already in this step is because you've made "almost" everything. Now you can explore the system. If you have internet you can go to Applications-> Internet-> Firefox Web Browser and navigate your favorite websites, watch your mail, etc. The joke of this is to not get bored while installing Ubuntu and you start to familiarize with the system. Final step
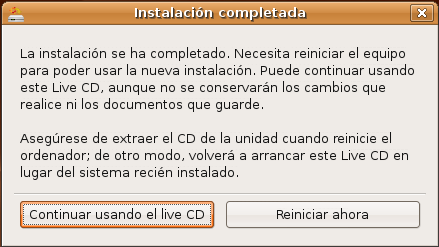
After installation a window will appear telling you that you can now restart your computer and enter your brand-new operating system. Click on "restart now." The system will begin to close, and just before restarting the computer will ask you to remove the installation CD. Now press "Enter" and go. Latest indications
:
After restarting you will see a screen with about 3 new options to enter select the first Ubuntu (Ubuntu Kernel 2.6 .... Generic), the second option is to go into recovery mode and the third (Memtest86 +) is to analyze the RAM for errors. If in case you have Windows or another operating system, it will appear below the 3 above.
When the system finishes loading you will see a screen where you must enter your user name (the second user that you provided during installation) and password.
Well, as I promised the installation was simple. Congratulations for your migration to Linux I certainly will not regret it. Greetings!
Source:
http://obux.wordpress.com/2008/05/31/como-instalar-ubuntu/ 

